Showing posts with label #photography. Show all posts

Tuesday, 13 December 2016

7 Questions to Ask When Buying a Digital SLR Tripod

Do you ever before take fuzzy pictures? Do you wish to improve the quality of your pictures?

Making use of a high-quality electronic SLR tripod is often the missing out on a trick to much better, sharper pictures.
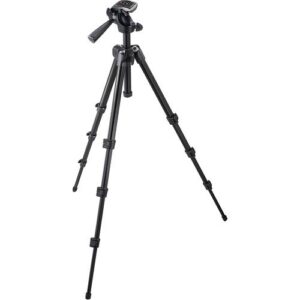
                                                      Image result for DSLR tripod
                                                                       SLR Tripod

If you prefer to change your direct exposure setups, use a telephoto lens, or if you just intend to explore the hand-operated settings on your SLR, after that you need a tripod. A tripod is of particular importance if you take pleasure in macro digital photography, landscape photography, evening photography as well as portrait digital photography due to much longer direct exposures.

So just how do you discover the appropriate tripod?

Not All Tripods Are Produced Equal

It's simple to be bewildered by the quantity and quality of electronic SLR tripods offered today. With tripods materials varying from aluminium and also plastic to premium carbon fibre, it's tough to know where to start.

As soon as you limit your selection to the type of tripod, you still need to choose from Canon Tripods, Nikon Tripods, Bogen Manfrotto tripods, Joby, Velbon, Gorillapod, Davis as well as Sanford as well as more.

One point is certain - not all tripods have developed the equivalent, and also it's very easy to buy the wrong tripod. Let's make sure you ask the right concerns and discover the ideal tripod for your demands.

Suggested Digital SLR Tripod Demands

Right here's just what you ought to take into consideration when shopping for a tripod for your SLR:

                                          Image result for Digital SLR Tripod Demands
                                                                      Digial SLR Tripod
Can the tripod support the weight of your electronic camera gear? Ensure the tripod is capable of sustaining the weight of your electronic camera and also lens system to stay clear of cam "sag" where your cam drops (or "tags") after you set up your shot.
What lenses might you purchase in the future (like a hefty zoom lens as an example)? Aim to select a tripod high sufficient to sustain your existing and also future video camera set to prevent acquiring two tripods.
Inspect the maximum and minimally prolonged heights to earn sure you can get close enough to the subjects you are photographing. Macro nature digital photography typically calls for a tripod that can go very reduced to the ground.
Will you be taking images outside? Validate that the tripod is heavy enough for gusty problems. Some tripods have a hook where you could hang your video camera bag to decrease the possibility of your tripod and also pricey video camera gear from blowing over.
Verify the configuration time meets your needs. Can you readjust the tripod swiftly enough for the subjects you are photographing? Some tripods have a tailored facility column while others, like the Bogen Manfrotto 055XPROB, have a quick centre column for much shorter setup and modification times.
Examine the weight and also measurements of the tripod. A heavy tripod could make a walking an unpleasant experience, yet a light tripod could shake like a fallen leave in the wind. If you bring the tripod thoroughly, think about a carbon fibre tripod.
Finally, will the tripod accept the kind of tripod heads you want to utilise? A lot of higher-end SLR tripods have removable tripod heads. There are both video and image tripod heads available which are configured for different types of digital photography.
If you take into consideration each of the above requirements, you will certainly discover it much easier to narrow down the checklist of available electronic SLR tripods to a tripod that meets your specific demands.

Tuesday, 29 November 2016

Photoshop Pencil Portrait

This tutorial will certainly clarify the strategies I make use of to produce digital pencil portraits in Photoshop. I have been doing these for a couple of years currently as well as have searched the web for some strategies of how you can do this. I have fine-tuned just what I discovered how to give this tutorial an extra accurate (and pleasing I could add) making.

                            Image result for photoshop pencil portrait

                                           Image of Photoshop Pencil Portrait

Some things can be carried out in advancement before the photo is taken to assist provide a more pleasing result. As an example, having a white history helps to have a cleaner separation of the subject. Additionally, having the subject wear white (or a few another light color) garments is a huge plus as it assists attract the customer to the person's face. Though these ideas are useful, they are not called for.

Okay, let's begin!

1. Open the image in Photoshop.

2. Create a duplicate of the background layer by pushing "Control J " on your keyboard. Currently, invert the brand-new layer by pressing ... "Control I ".

3. Transform photo to "grayscale " by clicking (Photo).

                               Image result for Transform photo to "grayscale " in photoshop

                                                   Grey Scale Effect in Photoshop

4. Establish layer mode to "shade evade " ... this will certainly make the coat look practically entirely white.

5. Currently, highlight some of the pencil strokes by using a Gaussian blur. For a 72dpi picture, I utilise a 55 radius setting.

6. Currently is the moment to make use of the brush (B) on your keyboard and also begin painting the unwanted locations of your photo white. Ensure you reduced the opacity of your brush to about 20% or so, have white picked as your foreground colour, as well as are utilising a soft edge brush.

7. Now allow's add some refined shadows to the face, chest and also clothes. To do so, see to it that your foreground colour is black by pushing (D) on your keyboard. Select your brush and lower the opacity of your brush (not layer) to 15%. Currently start painting over all the areas, that you feel a shadow. Specifically, the face. There are no rules right here. Just highlight some darkness that you really feel is right. This may take a little technique.

8. Currently, let's add some highlights to the hair. Select white as your foreground shade as well as make certain that the opacity of your brush is 15%. Beginning cleaning over the lighter areas of the hair to bring out some highlights. Notice that the adjustments are extremely refined. You do not wish to do it.rnrn9.Now it's time to combine the layers and plant the picture. Select ... Image-Mode-RGB Color as well as choose merge. Select (C) on your keyboard to raise the crop tool to crop the photo. You can also include a colour tint if you like by pressing ... (Control-U) on your keyboard to raise the Hue/Saturation home window. Select colourize from the reduced right window and play around with the sliders to get the shade you desire. That's all there is to it.

Fabian Barajas is the writer of several Photoshop book tutorials consisting of "How you can Develop Your Very Own Expert Looking Digital Backdrop!" His website that includes examples of his job is.

Tuesday, 15 November 2016

How to Prepare for a Travel Photography Trip

Whether you're an expert travel photographer on assignment or an enthusiast searching for the next beautiful shot, going with cam devices is difficult. From choosing exactly what all to carry, where to compromise, to handling your devices; there's constantly plenty on your mind. So we have narrowed the bulk as well as the question to a should have for travel digital photography checklist; 4 columns which will produce rewarding travel digital photography trip.

Packaging:

                                   Image result for travel photography package

Packaging equipment before a digital photography journey can be busy, especially when you have a lot of devices in mind. Allow's begin with the basic criteria you need to have clear before you go out on your trip.

The type of photography you desire from the journey (which will indeed establish the devices you'll need to carry).
The environment of the location you're posting likely to (which will identify the safety equipment you'll have to bring).
The length of the journey (which will certainly figure out just how much luggage you will certainly bring general).
Security:.

Buy a high quality, safety bag for your electronic camera, battery, memory as well as lens devices if you're a taking a trip photographer. It's much better to invest in hard cases. They're a great only buy offer ample storage space and safeguard devices against the toughest all-natural problems.

Bonus:.
                  Image result for extra batteries,sd cards for photography
It is a must to have a few extras as a backup for any journey, for a travelling digital photography one. If you're out shooting 3-6 hrs every day on your trip, make certain to bring added batteries, filters and also sd card (at least 3-4 of each).

To understand the price quote of the number of shots a battery gives when totally filled, take the very first photo from a fresh battery, of the one which you have just changed. Between cell pictures, you'll have a suggestion of the number of images a battery supplies you.

Most take a trip digital photographers shoot in the RAW layout, which uses up lots of memory space. Keep extra flash memory card handy as opposed to compromising on high picture quality. Bring flash memory card in a separate case/pouch to keep them from contact/friction and damage.

Cleaning:.
                              Image result for camera cleaning kit for travellers

It is constantly useful to have a few basic cleaning products for your imaging equipment, even if you're not a travelling digital photographer. Dirt, fingerprint spots as well as moisture always threaten to spoil your shot/equipment. Regularly carry:.

A couple of items of micro-fibre fabric as well as lens cleaning solution to wipe random spots and to brighten your lens with.
A hurricane blower to get rid of bigger particles and also dust bits.
A brush to clean your tools successfully and also small, tidy debris.
The Digital photographer's Personal Traveling Digital Photography Idea:.

Carry an added cam convenient. A little point and also shoot might work wonders for whenever you need to avoid lugging heavy equipment. You could not consistently carry your SLR; claim to a private dinner or a walk. However, it will pay favourably to have a point as well as shoot in your pocket for unanticipated minutes during your travelling photography trip. Nowadays, the imaging quality in factor, as well as shoot video cameras, is exceptional, and also they use a host of imaging alternatives. The underlying motif of the journey ought to be fun, discovering and exploration. Besides, that's why you began travel photography in the first place!